Sugar Mountain Center is a small farm and education center located at our 10 acre homestead in Tunbridge, Vermont specializing in permaculture and ecological landscape design and organic gardening support.
recent posts

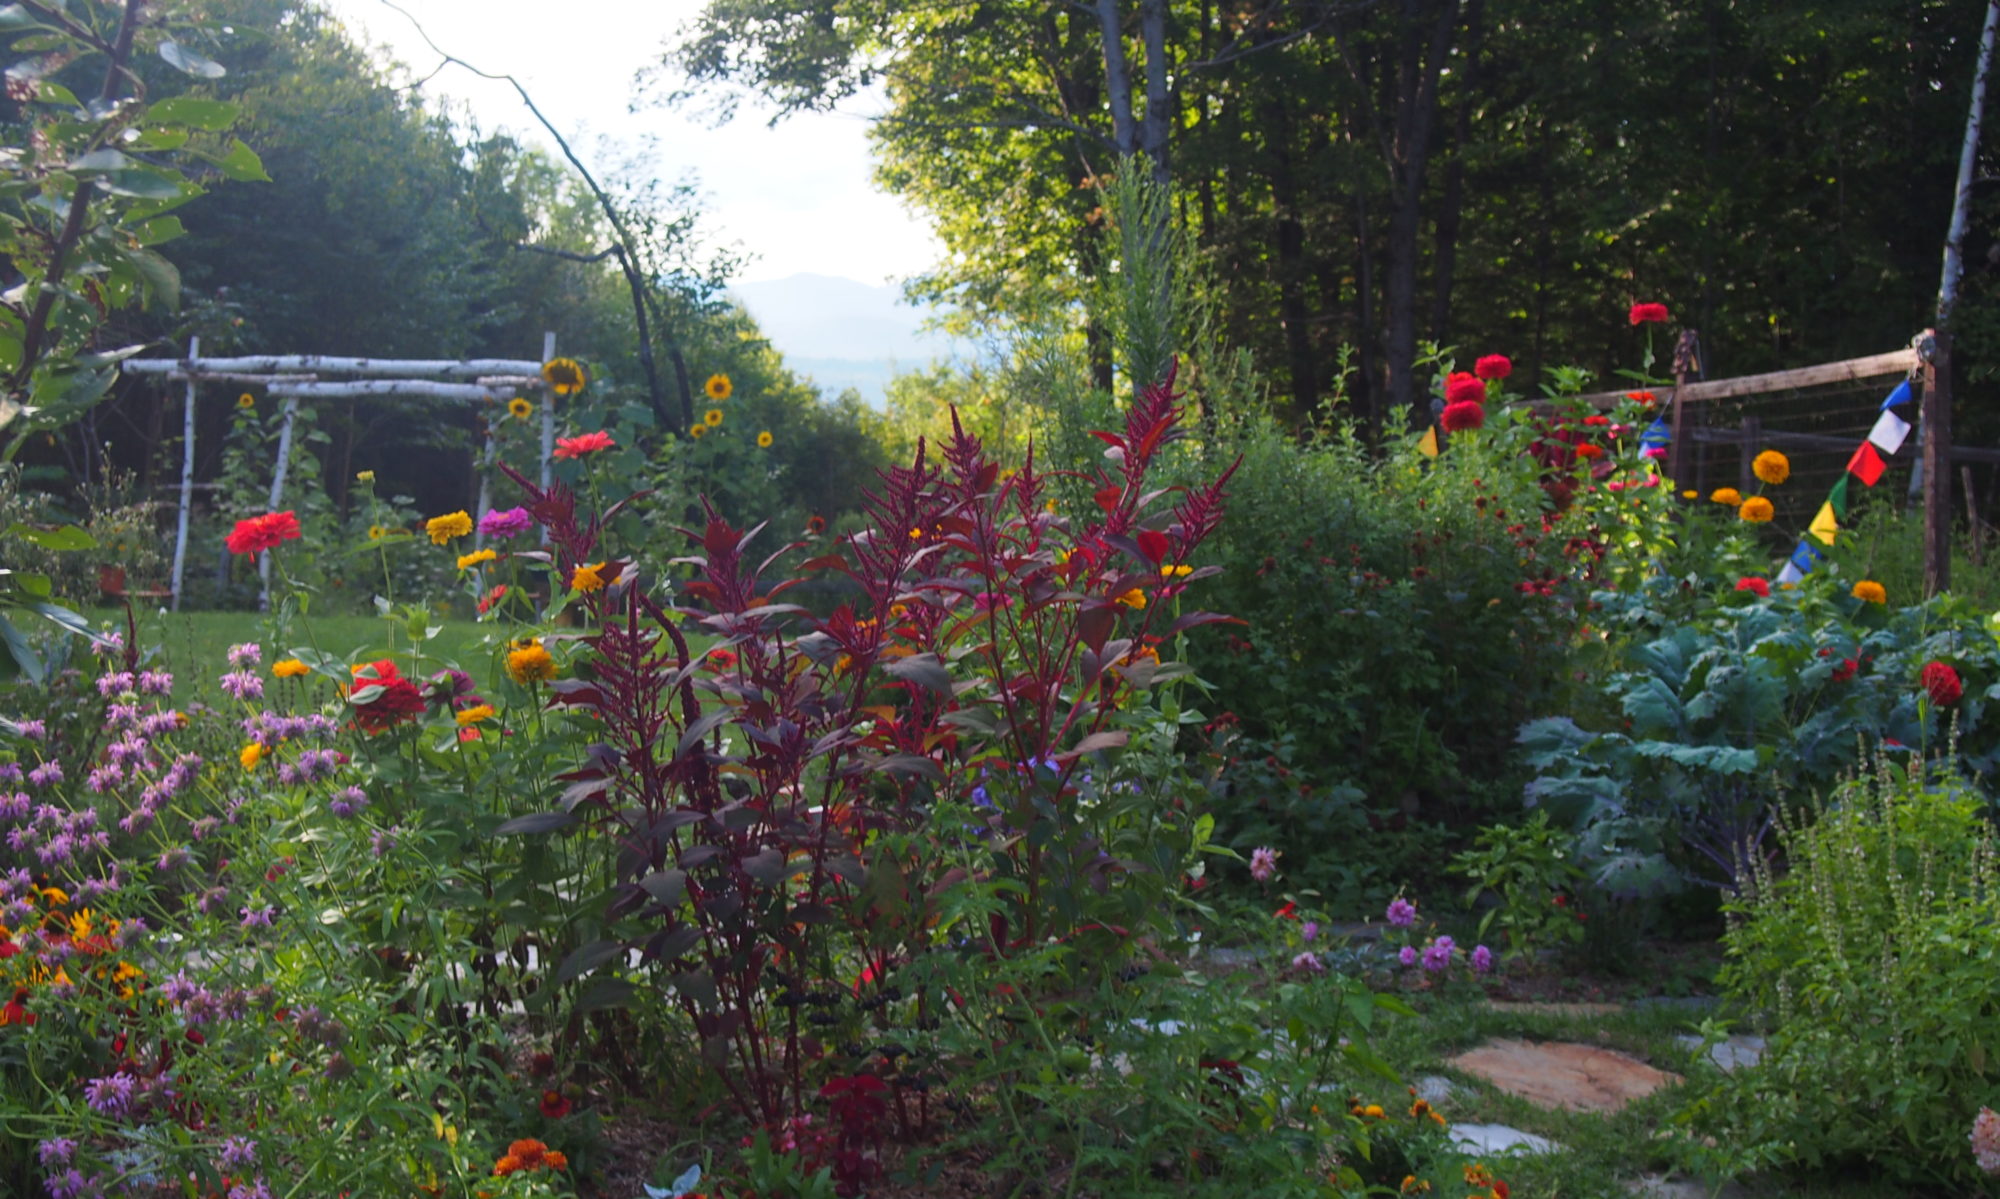
April 16, 2019We humans tend to like things organized. We organize our homes, our schedules, our meals, our whole lives. It’s only natural that we would be inclined to organize our landscapes.
When we think of gardens we tend to think of neatly weeded straight rows arranged by crop, or a few flowers placed at uniform intervals with large empty spaces between them. But, if you have ever taken a stroll through the woods you probably noticed that nature doesn’t organize itself quite so rigidly. Nature is diverse, complex, integrated, and flowing. Webs, spirals, rings, branches; these are the shapes that make up the natural world.
If our goal with gardening is to provide food, beauty, and increase ecological health- then we need to create gardens that look, feel, and act more like nature. Perhaps the time has come to reconsider our neat and sterile gardening methods. While letting go of rigid organization may seem daunting, it doesn’t have to be! Nature is beautiful, and thus, natural gardens can be too!
When we began the process of transforming our flat grassy lawn into gardens, we knew we wanted our design to be curved and twisting as well as diverse in species. We envisioned a series of delightfully winding paths with one garden bed flowing seamlessly into the next.
As a focal point for this design, we decided to start by building a large herb spiral. An herb spiral is a beautiful and easy way to incorporate natural shapes into design, while also providing microclimates for different species of herbs to thrive. Adding an herb spiral to your garden design has many benefits; it can add dimension, beauty, and diversity to your gardens. It is space saving, insulating, and increase yields. And of course, it will impress all of your friends and neighbors. Best of all, building one is much easier than it looks! To help you get started, the following is our step by step process of building and planting our herb spiral.
How to Build an Herb Spiral
Find your spot! Think about your sunlight, distance from your house, and larger garden design. Ask yourself questions such as; How far am I really willing to walk from my front door to collect a handful of parsley for dinner?
We picked a spot for the spiral right in the center of the lawn-close enough to the front door for convenient access when cooking, but far enough away from the shadow of the house to provide consistent sunlight. We planned to use this spiral as a starting point for a winding series of gardens-building outward and incorporating meandering paths over time.
2. Gather materials: Cardboard, whatever stacking material you choose or happen to have on hand (Bricks, stones, cinder blocks…), and soil/compost/sand
3. Lay your base. We decided on a size based on our lawn size and needs and laid out cardboard where we wanted the spiral to be. Our spiral is about 6 ft in diameter.
4. Next, use your stacking material (ours is mainly bricks and stone we happened to have laying around the yard) and outline your spiral. Lay your material in a spiral shape, starting at the center and working your way outwards.
The spiral should be oriented the way that water drains (clockwise in the northern hemisphere). You also want the bottom of the spiral (the outside edge/entrance) be facing north. When it comes time to plant, this will make it easier to organize plants based on sun, heat, and water preferences.
5. Next its time to stack. To create the gradual increase in height, start at the outside edge of your spiral, skip over the first few bricks, and then add a second row on top of your first.
6. Continue adding rows to the top of your spiral, being sure to skip the first few bricks or stones of the previous row. If you are stacking correctly, your spiral will start to look like it is gradually increasing in height as it goes inward.
Depending on how high you are stacking, the stability of the materials you are using, and how much you have on hand, you may want to stick a few stones on the inside edge to reinforce the structure. Adding soil and ultimately plant roots should help to keep the spiral sturdy as well.
7. Once you have reached your desired height, it is time to add fill. You need quite a bit of material to fill your spiral. We used a combination of soil from our garden and compost. We also added a bit of sand, especially near the top of the deep center, as we are planning to plant several Mediterranean herbs that prefer a sandy soil. You can also add sticks/rotting wood to the bottom of the deepest part if you like. This will eventually break down into nutrient rich material.
*note: if you are using less easily stackable materials (like round stones) it may be easier to add soil as you go…just fill the soil to the current height, then add the next layer, and so forth .
And voila! You have an herb spiral. Only one thing left to do…
8. Get planting! To maximize the benefit of the spirals unique micro-climates, plant top to bottom starting with herbs that prefer the sunniest, warmest, and driest conditions:
Top of spiral (sunniest, warmest, and driest conditions)-Mediterranean herbs and other herbs that require good drainage and full sun here. Ie Rosemary, Lavender, Thyme, Sage, Aloe, Oregano, Tarragon, lemon grass, mugwart
Middle of spiral (In the middle, a bit more moist and a bit more shade. The south side will be warmer and sunnier, the north cooler and shadier)-Basil, Parsley, Cilantro/Coriander, Sorrel, Borage, Chives, Chamomile, Calendula, Dill, Fennel, bee balm
Bottom of spiral (Wettest part)-mint, lemon balm, sorrel, skullcap, watercress, meadowsweet
“The construct itself gives variable aspects and drainage, with sunny dry sites for oil-rich herbs such as thyme, sage, and rosemary, and moist or shaded sites for green foliage herbs such as mint, parsley, chives, and coriander.”
– Bill Mollison
We would love to help you design your dream garden! Learn more about our services offered or contact us to schedule a consultation.
See events and register for our upcoming classes here! [...]
Read more...

March 18, 2019When we moved into our house we did what just about everyone does when they first move in…tore up carpets! Our house was built in 1979 and many rooms (and hallways) still had what appeared to be the original carpeting; a beautiful blood red, thick shaggy mat. We didn’t have the funds to pay a professional, so we tried our hand at flooring! Over the course of the following months I removed carpeting and replaced it with click-lock wood flooring in four bedrooms and a hallway, and restored a beautiful barn wood floor in our workshop turned classroom.
Lots of work, lots of fun, and an incredible transformation in the look of each room upon finishing!
But this post is not about those floors…it is about the other flooring experiment I decided to take on. Eventually I got to feeling sick of purchasing expensive wood flooring that was highly processed, shipped from afar, and certainly not sustainable. In my quest for an alternative, I had come across some pictures of beautiful cordwood floor projects and thought, wow! What an amazing idea! We have plenty of trees, we have a miter saw, I can do this!
Our house is a split level; the lower floor is finished but is half underground. While this is very convenient in many ways (a nice root cellar being one) it means that the floor doesn’t get a ton of light. There is an old laminate floor that is cold, drab, and peeling up in several places to expose concrete underneath. This is where I would try my hand at cordwood flooring.
I decided to start with the hallway because I had no idea how time intensive the project would be, nor how it would turn out.
First I took note of needed tools and materials:
Miter saw-ours is a 10 inch blade, but I would recommend larger for a large area of if you prefer the look of larger tree cookies
Freshly downed hardwood of preferred diameter.
Hammer and pry bar (or whatever tools needed to remove old flooring)
Strong wood glue, we used Loctite Premium 3X construction adhesive
Orbital handheld sander and some sandpaper
scrub brush, towels
sanded grout
5 gallon bucket
Linseed oil
Floor finish
I then began by gathering logs (this was easy to find because we had a ton of downed brush from a small area we had cleared over the summer). I looked for recently cut straight wood (generally maple and pine) of about 3-5 inch diameter and brought the logs under cover to dry out a bit. After a week or two, I used a miter saw to cut the logs into rounds (about 1.5 inches thick). I clamped some scrap wood to the saw as a guide for width.
Once I had gathered a large quantity of tree cookies (and I mean large!) I brought them inside, spread them out, and let them dry out some more.
Meanwhile, I was tasked with the fun activity of peeling up the old, very stuck laminate. Using a mini pry bar and a hammer I set out to tap and peel up as much of the old flooring as I could. This took some patience. Ultimately, I was left with a hallway of bare concrete.
The next step was the step I found by far the most frustrating in this process; the gluing of the tree slices to the concrete floor. I tried several types of adhesive to poor results, and finally settled on Loctite Premium 3X Construction Adhesive
While this still wasn’t perfect, and required reapplication in a number of spots, it held well enough for me to move to the next step…sanding.
Sanding was a bit of a challenge considering the fragility of the bonds, but with careful attention, I was able to use my handheld orbital sander to do a round of sanding to generally smooth and clean up the wood.
Next, I applied a layer of linseed oil, this is to protect the wood from moisture and keep excess grout from staining it too much. I applied a layer of oil with a large paintbrush and let dry.
Now for the fun part…grouting! For the grout, I used a sanded grout blend, and added about 1 parts sawdust to every 5 parts grout. I mixed the grout with water in a 5 gallon bucket (just a little at a time, being careful not to over moisturise) until the grout had a thick peanut butter like consistently.
I waited 10 minutes for the mixed grout to settle and bond, and then began grouting. Wearing plastic gloves, I used my hands to push grout into each of the cracks between the wood cookies, filling the spaces and doing my best to smooth it out.
Once the floor had been fully grouted and allowed several days to dry, I came in again with my sander, to even out the floor and sand off any grout that had stained the wood.
Finally, I topped the whole thing off with a coat of linseed based floor finish for a beautiful glossy sheen!
I had a ton of fun doing this project, and absolutely LOVE the way it turned out. I haven’t yet begun to undertake the kitchen and living room, a much larger space, but think it would look pretty amazing if we ever get there!
We would love to hear from you! Contact us to learn more, share your own stories and tips, or to schedule a consultation or training.
See events and register for our upcoming classes here! [...]
Read more...

February 15, 2019
As any experienced farmer or gardener will tell you, keeping frost off of new plants is essential to yields and overall success of crops almost everywhere in the world. One wants to start their plants as early as possible so they grow as large as possible but start too early and they may die or get stunted from an unexpected bout of cold weather.
Sugar Mountain Center is in Vermont and Vermont is cold. How cold is that for plants? Well, it is in zone 4b according to the USDA Plant Hardiness Zone Map and our first and last frosts are roughly May 21st and September 25th leaving only four months of frost-free growing season… not very long! Luckily, with a little bit of ingenuity and planning a plant’s growing season can be vastly extended in a variety of ways, even if they are not frost-tolerant. The most foolproof method is to start plants in a greenhouse.
This, of course, requires a greenhouse.
Though good options exist for buying a prefabricated greenhouse, at SMC we wanted something DIY that would add a little bit of character and reduce cost. Therefore, a greenhouse made from recycled windows seemed like a perfect project!
After a few months of combing local publications and craigslist, we were able to acquire all the glass we needed from free from the surrounding community. So much glass in fact, that we decided to add a special alcove with a full-sized bathtub/shower. This inspiration came from a similar “glass shower” that existed at Smoky Mountain Center in North Carolina. The heat and moisture from the shower coupled with floor-to-ceiling glass worked so well that it became our de-facto greenhouse.
Step-by-Step Guide to Building a Greenhouse from Recycled Materials
What you will need:
TOOLS
tape measure, level
post hole digger
shovel
hammer
drill
ratchet set (for lag bolts)
Drill bits
12″ drill bit (for lag bolt pilot holes)
saw (circular or mitre)
speed square
ladder
pry or crow bar
*MATERIALS:
Lots of windows
Lumber
A door (or two)
Nails
Lag-bolts
Screws
Clear Roofing Panels (most likely you will need to buy these)
*Your building materials may be different than ours based on what you can find in your community! Craigslist, community forums, freecycle, thrift stores, habitat for humanity restore, and even your local dump can be great places to find materials.
1. Designate an appropriate site with adequate southern exposure, light, and good drainage.
We decided to build a lean-to style greenhouse with the wall of our house on the north side. Though there are a few deciduous trees on the southern edge of the yard, the sun shines through the bare branches during the winter months, and by the time they have leafed out the sun rises higher on the horizon and they are not an issue. Make sure to observe how the sun, wind, and water impact your land over time before beginning any permanent building project.
2. Dig post holes in correct locations- For us this was 8′ from existing wall by 4′ apart. We determined the size and shape of our greenhouse based on the glass windows and doors we had available as well as the length of the wall the greenhouse would be connected to. Be sure to gather and measure your materials and space first, and then you can calculate the exact dimensions your unique frame requires.
*It is recommended to always bury 1/3 of your post height in the ground. Exact depth recommendations can vary depending on your climate and soil type.
3. Insert posts into holes and level (try to keep posts same height).
4. Concrete posts and allow to set.
*Caution if building in winter: Concrete takes longer to set in cold weather and if it is too cold I could potentially freeze. It is best to wait for a warm spell, though there are methods for protecting concrete while it sets.
5. Place horizontal post or “top plate” on top of posts and ensure level. To secure, drill a pilot hole through both the post and top plate and secured with lag bolts.
6. Build nogging between posts for rigidity and to allow places to fasten windows which will form the wall.
*Only put as much framing as necessary to keep your design structurally sound and allow places for windows to attach.
7. Create a “nailer board” by attaching a post horizontally 1 foot higher than the top plate to the exterior wall of the house. To attach the nailer board, lag bolt the post into studs within the existing wall.
8. Fasten rafters to top plate and nailer board to create the roof structure. We used 2X6s for the rafters to account for heavy snow loads.
9. Install clear roofing panels parallel with rafters. Be sure to start with lower panels first (like shingles) so moisture drains correctly. Use roofing screws and do not over-tighten so the panels do not crack.
*Be sure to use panels made to handle snow loads if you live in a place with harsh winters.
10. Attach windows directly to posts and nogging using screws. Keep cracks to a minimum. We attached some windows securely on all four sides, but attached our top row of windows to hinges so they can swing open and latch shut. This allows airflow in the greenhouse, which is especially important when it starts to get warm outside!
11. Install door in desired location and frame remaining wall with windows. Build a wooden frame using 2x4s to the dimensions of the desired door, being sure to leave enough space for door to fit within it.
12. Seal cracks using insulating foam for large spaces and clear silicone caulk for small spaces.
13. Construct or find tables to elevate plants to ideal height. It may also be necessary to level the ground before you install tables. If you happen to have some gravel handy, spread an even layer on the ground to both suppress weeds and improve drainage.
14. Grow!
More detailed information on building a “glass shower” to come in a future post.
We would love to hear from you! Contact us to learn more, share your own stories and tips, or to schedule a consultation or training.
[...]
Read more...

January 27, 2019For the urban, suburban, or rural home
I’d like to kick off our series of “how-to” blog posts with a perhaps underappreciated topic: home composting. I have recently taken to noticing how rare the practice still seems to be. I have been to urban homes, suburban homes, rural homes, homes of self proclaimed environmentalists, activists, and conservationists where precious egg shells, onion peels, and half eaten sandwiches go straight into a messy, smelly trash can. Despite being a super easy and common sense tool for both waste reduction and soil building, somehow, it is still not a regular part of our routines.
So why don’t we compost? Landfills are overflowing and soil is being destroyed all over the world, yet we continue to divert food scrapes and their nutrients unnecessarily into landfills rather than replenish the soil beneath our feet. Composting turns our own waste into a useful product right in our own home or yard. It is one of the most common sense ways to reduce our impact and its easy! We should all be doing it!
The following guide will explore reasons we don’t compost, and provide easy options for anyone to compost, no matter whether you live on a farm, in suburbia, or a high rise apartment.
In talking and learning from others in various circumstances, what I have come to find is that there are still many misconceptions and confusions around composting. Many of us have found reasons that composting just isn’t practical for us. This blogs purpose is to prove this notion wrong; composting is practical for everyone! Regardless of where or how you live, composting can be easy, neat, odorless, convenient, and useful.
Lets take a moment to explore some common questions, confusions, and misconceptions that prevent us from composting. By the end of this post, I hope you will see how simple and sensible composting can be!
Lets start with a tiny bit of Science:
Organic matter (food/yard waste) is broken down by microorganisms (bacteria, fungi) into a simpler substance (soil). Microorganisms, with the help of worms and other beneficial ground-dwellers, consume organic waste and excrete nutrients that plants need to grow (Nitrogen, Phosphorus, and Magnesium).
When we set up a home compost, we need to manufacture an ideal environment for microorganisms to thrive (oxygen, warm temperatures, and nutrients). Then those microorganisms will kindly do all the work of breaking down our waste for us!
THE CYCLE OF NUTRIENTS: Lets take for instance, a head of broccoli.
The broccoli takes nutrients up from the soil through its roots as it grows, helping it develop the delicious flavor and nutrient-rich qualities that keep us humans healthy.
When we pick that broccoli, the nutrients are removed from the soil along with the plant.When we throw away our leftover scraps the nutrients are disposed of too, sitting in a sealed landfill somewhere surrounded by lifeless seas of plastic and styrofoam.But, if we compost our broccoli instead, we return the nutrients into soil as they are broken down by microorganisms, which we can then use to replenish our gardens, thus aiding the cycle of life!
“This all seems very complicated. What do I actually need to DO?”
Not much! If all this science talk is hurting your brain, don’t worry about it! All you need to do is find a vessel for your compost (a bin, a bucket, a hole, or even just a pile…read on for compost system options and ideas) and provide a balance of “green” and “brown” material in your compost.
“Greens” = nitrogen rich material: food scraps, cut grass manure, egg shells, coffee grounds, plant trimmings/weeds
“Browns” = carbon rich material: dried leaves/plants, sticks, straw, hay, twigs, pine needles, sawdust, wood chips, newspaper
It is usually recommended to put 3 or 4 parts brown to one part green (brown:green – 3:1 or 4:1).
In layman’s terms, if you throw in one handful of veggie scraps then top it with 3 handfuls of leaves. That’s all there is to it!
“This seems like a lot of work. I’m busy enough”
Composting can be as simple as throwing your food scraps in a pile, and covering it with leaves. You can turn it if you want to, you can add water occasionally, but you don’t really have to do anything.
Seriously it is SO SIMPLE:
Put your food waste in your compost pile
Throw a bunch of leaves, sawdust, or newspaper shavings on top
Every so often turn the pile and add some water
And…that’s it! You have successfully composted!
“OK maybe composting isn’t complicated, but it is gross and smells bad!”
Composting only smells when done incorrectly, and it is far from gross. If anything, it saves your garbage can from becoming full of leaky drippy molding food waste. As long as you remember to top your waste with some browns, you shouldn’t have any issues.
“But a compost pile would be an eyesore in my yard” There are SO MANY different ways to create and organize composting systems. If you want your compost to be neater and trendier than just a pile in the corner of the yard, or even if you don’t have a yard, read on. Here are a few different simple ways you can compost:
The basic backyard compost bin: You can find designs for backyard compost bins from as simple as a box made out of wood, to complicated and stylish systems utilizing all sorts of materials; wood, wire, trashcans, milk crates, cinder blocks, barrels… here are a few creative ideas
You can spend hours online sorting through all sorts of interesting designs; if you have the time and the creativity, go for it! BUT you don’t have to build anything complex in order to compost.
Here is the compost bin I built:
It is an extremely simple design that anyone with a hammer and a couple nails can put together. I basically just made a box out of wood. It isn’t fancy, it doesn’t even have a lid. But it keeps things neat and does the job.
I keep a holding unit made of chicken wire next to my compost bin filled with leaves that I rake up in the fall. Every time I dump a fresh bucket of compost in the bin, I top it with a large handful of leaves. This helps provide that balance of “greens” and “browns” I mentioned earlier, keeping the compost from smelling, and helping it break down faster.
Composting in place: You can save yourself even more work by composting “in place” by layering browns and greens anywhere you want to have a garden! Start by placing a layer of cardboard on the grass or build a raised bed, then layer compost for a season (browns and greens). Next year, plant the bed and move your compost to a new spot OR your garden bed from last year.
“I don’t have the space! I live in a tiny apartment” Whether you live on a farm or in a high-rise apartment, there are ways you can compost your food waste anywhere. It may take slightly more thought to compost in an urban environment, but not much. There are several methods that can be easily used to compost in limited space:
The store-bought composter: If you don’t want to DIY or are uncomfortable with the idea of a compost pile or even if you live in an apartment with only a small balcony, you can purchase a store bought tumbler. There are various styles and designs. I have used this type to positive effect:
Just dump in your waste, add a few leaves, some straw or some newspaper, and turn. easy peasy! Aside from the many benefits of compost, for many people this option will greatly reduce the mess and smell of food waste in the garbage where it will stay until it is removed some days or even weeks later. It is discrete, self-contained, blocks all odor, and works quickly.
The Vermiculture: Vermiculture uses worms create super nutrient rich soil. It is surprisingly cleanly (you do not see the worms), doesn’t smell, and is really cool! The drawback is that unless you have the capacity and space for a giant vermiculture project, it can only accommodate small amount of waste at a time and you can’t compost everything. There are great store bought vermicultures you can buy that are compact enough to fit even in a city apartment. Some are even pretty stylish:
Build a DIY indoor composting bin:
Get a large container and poke some holes for aeration on the bottom and top. Be sure to put something underneath to catch any water that drips out.
2Put a few inches of soil in it and add some shredded newspaper.
Add food waste as you as you accumulate it and top with newspaper and a cup of soil each time.
Add a few sprays of water occasionally if it seems dry and turn it once a week.
Once it is full you can use it to plant flowers or some indoor greens! Or give it to a friend who gardens, they will certainly thank you!
Take your compost offsite: If you live somewhere where you really have no space to compost in your home, you can store it in sealed 5 gallon buckets and take it elsewhere. Neighborhood community gardens will likely take your compost gladly. Many cities and towns now have commercial composting programs where you just separate your food waste just like you do your recycling and have it taken by the trash collector to industrial composting facilities.
Tips and tricks:
Keep a small airtight compost container in your kitchen for convenience and style
If it is a long walk outside to your compost pile, keep a 5 gallon bucket under your sink or right outside your backdoor so you only have to walk to the pile once or twice a week.
Before composting your food waste, try freezing veggie scraps and chicken bones and reuse them for to make stock. Just dump a bag of frozen scraps in a pot of water, add some salt, pepper, and a couple bay leaves and simmer away! Your kitchen will smell like warm soup. And you can still compost the remains when you are done!
For the more advanced composter, try these ideas:
Incorporate chickens into your backyard compost system! Chickens will poop in your compost bin adding slow-release nitrogen and aerate the compost as they run around in your compost, having fun looking for worms to eat. It’s a win-win! This will super-charge your compost; increasing the speed and quality of your compost while reducing your need to mix and aerate your pile.
Learn how to use a hot compost bin to heat a small greenhouse!
I hope the information above has convinced you how easy, cleanly, sleek, and practical composting can be. If you have further questions feel free to get in touch with us. We would be happy to answer questions or schedule an onsite consultation to get your started with this or any other project! [...]
Read more...

November 18, 2018We have been pretty quiet on the blog for a while, but that certainly isn’t because nothing has been happening. On the contrary, we have been so busy this past year that there has scarcely been a moment to sit and reflect!
Since the last time we posted exactly a (leap) year ago, we have been doing project after project after project to get the new space event and program ready. We built a greenhouse, converted our garage into living and community space, converted grass to landscaped gardens, built an herb spiral, planted fruit trees, built a composting toilet, made up-cycled spool tables, installed a cordwood floor, the list goes on…
After a winter, spring, and summer full of dawn to dusk projects, we finally had an opportunity to test the event readiness of the homestead…
On September 2, 2018, Sean and I were fortunate enough to be able to host our own wedding here at our home and the future site of Sugar Mountain Center. Loved ones came from near and far to help us break ground in a celebration of love, community, and friendship.
We were especially grateful to be joined by most of the members of our original conservation corps family, the SCA NH Corps. New Hampshire Conservation Corps is where Sean and I met in 2011 as part of a cohort of 30 young adults who lived and worked for a year in Bear Brook state park in the middle of the NH woods.
This reunion was so special because it brought together those who were such a meaningful part of where it all began. New Hampshire Corps not only helped us begin our personal relationship, but also taught us the rewards of being part of a community, showed us the value of ecologically-conscious living, and shaped our desire to share this life changing-experience with others.
We had over 100 guests for the wedding, about a quarter of whom stayed with us onsite- testing our kitchen, composting toilet, campsites, and community spaces. Amazingly, the weekend’s festivities were pulled off seamlessly. It was an incredible experience and we are deeming the test of site readiness a booming success!
We want to thank all of our friends and family who went above and beyond to help us make the weekend the most magical experience that we will cherish forever.
And now…we look towards 2019 for the public opening of Sugar Mountain Center. We plan to hold a grand opening event sometime in May 2019 and will be offering workshops and events summer 2019!
In the meantime, please check back here over the coming weeks where we will be sharing a series of how-to’s on some of our projects this past season.
[...]
Read more...

November 17, 2017Here I sit in our cozy living room, my hands cradling a mug of hot cocoa, watching giant snowflakes fall quietly on our little homestead. The season has finally decided to change, and with the colder weather comes a call to slow down and enjoy some rest and reflection.
The break is welcome, as up until this point we have been working around the clock to get our spot into shape, with a lofty goal of beginning to host trainings and events by next summer. As per SMC tradition, our house is covered in white-boards all sporting various charts and to-do lists.
Daunting at times, but so rewarding seeing the center begin to take shape. In the past few months we have cleared lots of brush, cleaned out and sheet mulched the gardens, planted some perennials, built a compost, put in floors, split firewood, painted, purchased tools, experimented in making lumber, and made plans to convert our two story garage into a meeting and bunk space. We are currently working on building a greenhouse using recycled windows and lumber milled on site, working fast so as to beat the heavy snow!
Was a lovely fall…
And now we are looking forward to the calm and beauty of winter! [...]
Read more...

October 1, 2017We are excited to unveil plans for SMC Northeast; henceforth known as Sugar Mountain Center! Late this July, we officially became owners of a beautiful 10 acre property in the Vermont Mountains on the South Royalton/Tunbridge border, and have already begun working hard to transform the new permanent space to be ready to host trainings, events, programs, accommodate guests, and grow food.
Sugar Mountain Center will build upon the vision and mission of Smoky Mountain Corps, working to support resilient community, foster environmental stewardship, and promote sustainable agriculture practices.
The new training center and residential facility will support trainings, retreats, community events, and service learning programs in conservation skills, permaculture, leadership development, and low-impact living. Our goal is to be ready to host trainings by next summer.
And what does all of this mean for now? Lots and lots of work! We have already begun, and will be spending the coming winter and spring (and the many years that follow) transforming our space…converting a garage into meeting and bunk space, building a pavilion, prepping gardens, planting fruit trees, and many more exciting projects!
Here are a few photos of our work thus far. If you are interested in volunteering to help with any project, please contact us at hebuckner@gmail.com. There is lots to do! We may be able to make work/trade arrangements, and are particularly looking for anyone with carpentry skills.
We also of course are always accepting donations via paypal or through mail to 34 Gee Hill Road, South Royalton VT 05068.
Thanks again for all your support, and stay tuned for progress! [...]
Read more...

July 8, 2017The new Smoky Mountain Center in Tunbridge/South Royalton, Vermont closes on 7/28/2017, so in the meantime Heather and I have been tinkering with other projects.
I finally had the time to complete a project I have had an eye on for a while, the Infinity Mirror! It was incredibly fun and has made on of the most useful (not to mention beautiful/trippy) items I own.
First, I went to Home Depot and bought materials to make an easy and large Infinity Mirror. The dimensions are 30″ x 24″ (32″ x 26″ with frame). I hope to turn this into a coffee table with relative ease. The results were well beyond my expectations!
Take a look at the video which explains the process and shows off the finished product.
https://www.youtube.com/edit?o=U&video_id=2uUCXeaGrf4
How to Make an Awesome Infinity Mirror!
I was able to easily make this infinity mirror from a few items available almost anywhere. Everything was gotten at the same Home Depot near my house in one trip.
Materials:
(4) $8 -“x2″x30″ for wooden frame
(2) $2 -3/4″x1″x8′ trim for interior spacer
(1) $6 – Roll of Black Duct Tape (regular will work, black is best)
(1) $20 – 24″x30″ Mirror (square, no frame, beveled is fine)
(1) $10 – 24″x30″ Pane of Glass (the thicker the better)
(1) $30 – 36″x15′ Mirror Window Film (one roll can make 7 of these)
***(1) $60 – 18” LED Color Strip Lights (with remote)
Total Cost: $136 (Made it entirely free with found materials the day after making this)
***I got the deluxe LEDs for this one, because I wanted to go all out. This piece can be a simpler LED strip, Christmas lights, etc.***
Tools Needed:
Spray Bottle with Light Dish Soap Water Mixture
1 or 2 Bath/Beach Towels on a Flat Surface
Scissors
Box Cutter
Saw (any kind really, there are only four minor cuts)
Step 1: Set Down one or two large towels on a table or flat surface as a work space. The towel gives a forgiving cushion so the glass is less likely to break.
Step 2: Clean the glass pane extensively. Make sure as little hair/smudges/dust is on it as possible. Then spray the glass with the soapy mix, do not wipe off.
Step 3: Cut a piece of the window film to roughly 26″ x 32″ (eg a few inches bigger than the pane). Remove the protective cover from the window film. Spray the soapy mix onto the adherent side of the film helps to take of the covering. It will be put straight onto the soap anyway, so feel free to douse it.
Step 4: After removing the protective cellophane-thing from the window film, very, very carefully lay it onto the pane of glass. This is hard to do well, you may want to watch a video for the technique. It helps to lay it on from the top of the 24″ side and slowly walk it down to the bottom, removing the large air-pockets as you go.
Step 5: Take a flat smooth surface (a credit card works well) and remove as many of the imperfections in the film on the window. It will be a lot of small air bubbles which may require a slight bit of readjusting corners of the film and such. Be careful it can tear and might be useless.
Step 6: Set the filmed glass to the side and let it dry. By far the hardest part is over, enjoy the rest it is a lot more fun.
Step 7: Set the mirror on the towels, this will be your work space for the rest of the project.
Step 8: Cut the 3/4″x1″8′ trim to fit on the edge of the mirror (two cut to 23″ and two cut to 30″ or whatever). This trim can be as small as your light strip will allow. I probably could have used 1/2″x1″2″x8′ and it would have been even better. The mirror will reflect the space between the two panes back and forth. The narrower the space, the more often it reflects. Therefore if the space between is 2″ deep it will replicate half as often as 1″ and a fourth as often as 1/2″. It is a matter of preference. With the tape my space is probably 7/8″.
Step 9: Apply the duct tape to the piece of trim. Only one side needs to be solidly covered (the side that will be reflected).
Step 10: Cut two of the 2″x2″x30″ pieces of wood to be 2″x”2″28″ (just cut off two inches on one end). Then make the box around the outside of the mirror and screw the ends together.
Step 11: Put the trim with the tape around the inside of the box over the lip of the mirror. The covered side should be the vertical one between the panes.
Step 12: Create a space for the LED’s wiring to enter and exit. You can use a drill or saw, or do it before fastening the frame, but there needs to be adequate space for the strip(s) to exit on one corner.
Step 13: Apply the LED Strip along the inside of the trim all the way around. Feed the wiring through the corner. If using 18′ LED’s exit at the same spot and apply the rest of the strip wherever you like (I wrapped it around the outside of the frame, which looks great and makes it a decent light-source as well).
Step 14: Back to the last annoying part. When the pane has dried take a box cutter and cut the excess film off of the pane of glass. You can cut up to 1/2″ of the film at the edges of the mirror. Using a straight edge just inside the edge of the mirror seems to work best.
Step 15: Take the filmed pane of glass and put it into the frame with the film on the inside of the mirror.
Step 16: Turn on the mirror and be amazed!
The first mirror was such a success I made a second Infinity Mirror entirely (nearly entirely) out of Recycled/Upcycled materials found around the house. [...]
Read more...

June 19, 2017Many exciting changes are in the works for Smoky Mountain Corps these days. After three amazing years of building community, growing food, learning, and serving the parks in Southern Appalachia, Smoky Mountain Corps/Smoky Mountain Center is moving north. Wayyy north. To Vermont. I will get to that in a little bit, but first, I want to share a bit of our experience thus far.
The past few years have been an almost indescribable journey for me. It wasn’t easy, creating Smoky Mountain Corps and keeping it going strong for multiple years took virtually non-stop work with little monetary compensation. Oh, and of course there was the ever looming threat of total failure.
I have learned so much about so much these past several years. I learned to negotiate with CEOs of large organizations. I learned how to build community partnerships, create programming from nothing, and find money for projects. I learned how to be in charge of other people (still learning that one). I learned how to get corps members to appropriately ration a block of cheese. I learned how to apologize for screwing up and how to let things go. The list goes on and on. There are so many inspirational mentors, community leaders, corps members, and partners to thank for our learning and our success. I have learned so much from those around me the last few years, from the incredible organizations in our community, to eager corps members, all the way down to the guy who rented out our yurt for a while.
All this learning and growth has its rewards of course. For instance, it is a remarkable feeling to run into a former corps member at Great Smoky Mountains National Park–in uniform and working on a paid national park crew, or to come across a Facebook picture of former members reuniting a year later. Being able to watch and help young adults realize their potential, build long term support systems, and find ways to make a living helping others has been truly inspiring. For me, it is the reason I do this.
This learning and growing and success has been so much more than a personal journey. During the 2016 season, for instance, our members managed invasive plants with Mountain True, built trails in the Great Smoky Mountain’s National Park and the Appalachian Trail, harvested produce for Dig-In Community Garden( a program that provides fresh produce for families in need), taught elementary students about gardening and nutrition with FEAST, and created a new wildlife sanctuary in Chattahoochee Bend State Park. They also learned about permaculture design, lasagna gardening, fermentation, canning, botany, and food justice. It was an incredible season filled with personal and professional growth for all involved.
And though SMC is moving north, we did have a final opportunity to leave our mark behind in Burnsville. We worked this spring with the Toe River Food Security Network and several local partners to secure an AmeriCorps VISTA for 2017-2018 who will be tasked with coordinating partnerships and supporting a number of projects to alleviate hunger in Yancey County. Additionally, we will continue to provide support to our southern partners from afar by facilitating connections between project needs and volunteers as well as continuing to provide support for the Chattahoochee Bend State Park Wildlife Sanctuary.
And now, please bear with me for a gigantic THANK YOU, THANK YOU, THANK YOU to all our partners, mentors, supporters, and friends in North Carolina, Tennessee, Georgia, and around the country who have helped make SMC go from vision to reality. There are way too many people and organizations to thank here, but ya’ll know who you are.
Because of you, SMC went from some scribbles on a small piece of paper to a real place in real time with real people. People who among other things, created or improved over 35 miles of trail, built or maintained 178 structures, managed 200 acres of invasive species, cleared and planted 4000 sq ft of gardens, harvested over 7000 lbs of food, and provided training and education for over 200 students and community members. Even more significantly (in my opinion), you gave over 25 members, staff, and volunteers an unforgettable opportunity for training, experience, and lifelong community. So from the bottom of all of our hearts, THANK YOU.
Finally, the moment you have been waiting for, we would like to announce phase two of our project. Smoky Mountain Center will become Sugar Mountain Center. We are purchasing a 10 acre property in Tunbridge, Vermont, where we will soon roll out plans to convert the space into a training and community service center focused around conservation, sustainable agriculture, and community building. It has always been the dream to find a place of our own to be able to support programming in a more permanent way, and we are thrilled the opportunity has presented itself. SMC is living on, and we are more than excited to keep the dream alive. Stay tuned for detailed plans for phase two and ways you can help!
-Heather [...]
Read more...

November 7, 2016Southern Exposure
By: Elizabeth Villano
On my way up to the homestead, my GPS cut out. “No service!!”, my phone cheerfully rubbed in my face. As I slowed to a stop, I surveyed the gorgeous mountains around me- surely the same ones that were scrambling my previously taken for granted cell service. After finding SMC, it didn’t take me long to discover an eclectic community hidden in the idyllic Blue Ridge mountains, one that constantly surprised me with its generosity, curiosity, and passion. I found good friends, even better food, and a space to explore who I was and where I wanted to go.
As a member of the Food Access crew, a kick-butt dynamic duo composed of Jess and myself, we focus on bridging gaps in the food system. And if that seems vague and liberal artsy, we thought so too until we got down and dirty with a month of learning from incredible women (as I affectionately took to calling them, our boss ladies) about the tireless work they do to ensure everyone gets the education and food they deserve.
Before I get into what we did, it’s important I take a moment to talk about what food access is, and what gaps in the system actually look like. While it may sound daunting by name, the food system is everything and everybody that goes into producing, distributing, purchasing, and consuming food on a global scale. In 2015, 42.2 million of Americans lived in food insecure households (lack of access to healthy and fresh food), including 13 million children. North Carolina, the state we work in, comes in at number eight, with 15.5% of the population reported food insecure. Food insecurity is a pretty name for a serious issue- children who face food insecurity face potentially irreversible developmental stunting. Latino and black communities, both of which face disproportionately high levels of food insecurity, face continuous and systematic blows to their communities, increasing risk factors for disease, poverty, stunting. (Source: Feedingamerica.org) Food affects us all- when you’re hungry, or when you only have access to highly processed and unhealthy food, you can’t think as well, your body doesn’t work as well, you’re more at risk for injury, disease, malnutrition. And beyond basic human rights, you’re not as productive- food insecurities have been causally linked with decreases in GDPs. (Source: WHO). To learn more, watch this engaging and incredibly informative John Oliver episode.
We started off our whirlwind tour with FEAST, an incredible and well-respected organization based in Asheville, NC that seeks to empower youth and families to learn about food, and to eat healthy. We were stationed with two teachers, Miss Jordan and Miss Summer at two different elementary schools: Vance and Fletcher Hall Elementary School respectively. Both women ran community, learning based gardens that were incorporated into the curriculum at each school. In addition to the monstrous task of caring for a garden, both were able to find innovative and engaging ways to engage the kids with gardening, growing and cooking fresh vegetables. One lesson that stood out was one that Jordan did at Vance, where she told the kids that they were a part of an alien race that was having a lot of trouble growing food, and were sent to Earth to figure out how we were growing food so well. We helped them sift through the dirt and take notes about different types of soil retention and composition. The FEAST model works to establish an early foundation of environmental stewardship, while simultaneously broadening children’s exposure to fresh and healthy produce- and teaching them how to use it. Some of my best memories from SMC have been playing with kids, teaching them to love gardening.
We also had the opportunity to work with Dig In, a community garden based in our hometown of Burnsville, NC that grows tons (literally) of fresh produce, and donates it all to food insecure families in the area. Dig In, a powerful and resourceful nonprofit, is run by two powerful women, Kathleen and Olivia. Dig In is unique in the emphasis they place on community empowerment- they don’t just grow produce, they create a community that rallies around their battle cry. Kathleen, as we very quickly realized, knew just about everyone there was to know, and managed to get them all thinking about food access. From an elderly farmer named Kermit across the road from their facilities who was quick to volunteer his equipment, to a new area transplant looking for community and good work, Kathleen and Olivia were so successful that people all the way in Asheville had heard about our work. One day that I will always remember was a gleaning session we did in a nearby field. On a typical farm, when a farmer has already gone through their field and taken all of their crop that they could sell, they leave the rest of it to rot. Most of the food is left for aesthetic reasons- too small, a weird shape, has something growing on the outside. Gleaning is when a group of volunteers comes and takes the food to people who need it. We moved about 7000 pounds of squash off the field to food banks in the area- food that otherwise would have gone to waste. Dig In firmly believes that lower income people should not have “seconds”, that they deserve healthy and organic food to be grown for them just as everyone else receives. Their humanistic and empathetic approach to the food system left both Jess and I feeling touched, and proud to have worked with them.
We’ve been fortunate enough to work with a diverse array of incredible people, and learn about their innovative solutions to tackling such a large problem. I know I’ll be taking these experiences with me, and keeping in touch with the incredible people we met along the way! [...]
Read more...

October 29, 2016Surveying and Managing Non-Native Invasive Plants in Southern Appalachia
By: Stephen Knutson
“You’ve heard of Kudzu, right?”
This was our token response for interested campers at Davidson River Campground, where our crew of three Corps Masters and one experienced supervisor (Lauren Reker of Mountain True, an Asheville-based non-profit focused on positively impacting our region’s ecological contition) were charged with surverying the non-native invasive plant content of an expansive 150-acre piece of property nestled in the Pisgah National Forest in Western North Carolina’s Blue Ridge Mountains. We would then go on to explain that no Kudzu exists in our current survey area, but the plants we are interested in have the same propensity to spread like wildfire if left unmanaged, depriving our native community of the sunlight and soil nutrients that are so vital to a heathy forest. Plants like Multiflora Rose, Japanese Honeysuckle, and Oriental Bittersweet can climb into the sub-canopy and even the canopy layer, raining down seeds and quickly expanding their territory. Invasive trees and shrubs, like Chineese Privet, Autumn Olive, and Japanese Barberry are heavy seed producers who can easily form monocultures, outcompeting crutial native flora in the process.
“You’re surveying the entire campground?”
Campers were often amazed that a team of four individuals could accurately and efficiently collect the data required to sufficiently inform future management initiatives on the Davidson River property, especially considering the size of our survey area and the duration of our project, which was about eighteen total workdays. Surveying was slow going at first, as Katie and I had no prior experience identifying non-native invasives. However, thanks to Lauren’s breadth of knowledge and Nathan’s prior experience in the field, we were able to catch on quickly and were soon covering huge tracts of campground and forest every day. Our team used GIS software to delineate polygons (never more than an acre in area) based mainly on natural borders and existing landmarks within the campground. Once we were all clear on the spacial extent of a particular polygon, we would divide and conquer, with each team member surveying the percent coverage, age class, stem density, stratification, and seed presence of a select number of our target species. We would then reconvene, compare notes, and set out to reconnoiter the margins of our next survey area. This process allowed us to be incredibly efficient in our data collection and resulted in the timely competion of all objectives associated with the Davidson River Campground project.
“My favorite part of the biome.”
As far as physically managing non-native invasives goes, an ecologist has many options to choose from, and that choice is influenced by factors such as effectiveness of treatment and collateral damage to the surrounding native community. One of the most effective strategies with the lowest chance of causing unintended harm to surrounding flora is known as cut-stump application. This process involves cutting a woody-stemmed target as close to its base as possible and subsequently dobbing both stem and stump with a 50/50 concentration of herbicide. It also creates copious amounts of biomass, which must be removed from sensitive areas and properly disposed of. Cut-stump can also be effective without the use of herbicide, which is necessary when working in close proximity to rare and endangered species like Bunched Arrowhead and Pitcher Plants.
“Ghostbusters from planet Eastwood.”
Another management tactic our crew became intimately familiar with this season is foliar application, or the process of applying herbicide directly to the leaves of target species via backpack sprayers. While this strategy is very efficient timewise, minimizing collateral damage becomes much more of a priority, and spraying is therefore reserved for significant inholdings of invasives located a sizeable distance from any rare or endangered species. Other management practices include string-trimming and hand-pulling, both of which are mainly reserved for non-native grasses, such as Microstegium, or Japanese Stilt Grass.
“So, how do you manage Kudzu?”
What most people don’t know about Kudzu is that the leaves are edible, with a similar flavor and texture to collard greens. While we as humans are a long way from incorporating this invader into our daily diets, Jasper and his thirteen hooved and horned counterparts subsist almost exclusively through the herbivorization of Kudzu. And they don’t just eat the leaves. These bad boys cause significant stem damage, hitting the plant where it hurts, and truly making an impact on their project sites. A herd of fourteen goats can typically devour an acre of Kudzu in around three weeks’ time, making applied herbivory one of the most effective and ecologically sound management strategies for dealing with the vine that ate the south.
“What’s the Point?”
Many campers at Davidson River would ask us, “What’s the point? Why not let nature take its course?” It’s here that the word, “Conservation” comes to mind. We do this work in order to maintain and revitalize our native plant community, one that is nearly unrivaled in its level of diversity. We do this work to provide conditions in which rare species can not only live, but thrive, and we do this work to preserve the natural ecosystem of the Southern Apps that draws so many folks to this beautiful region every year. We do this work because we love and value the natural world, and we take pride in it because we know we’ve made a difference, a positive impact, in the place that we call home. And, to anyone involved in conservation, food access, animal rescue, or any other form of relief work, I, and every soul you touch with your selfless actions, truly do appreciate all of your hard work and dedication.
“That’s all, folks!” [...]
Read more...

October 21, 2016“Can I eat it?”
By: Nathan Wells
Words you might expect to hear from a child are often uttered at our worksites or on walks around the homestead here at Smoky Mountain Center (SMC). We are fortunate to have met so many great botanists, permaculturists, and herbal medicine experts during our time here. Our skills at identifying plants and their uses have really blossomed, pun totally intended. I have a goal of one day being able to feed myself (at least short term) solely from food I find or grow myself, and SMC has helped me take several steps in that direction. Half of this year’s program focuses on continuing to develop food access and food security projects in the communities of Western North Carolina, and that commitment is reflected at the homestead.
The title on our time logs may be Smoky Mountain Conservation Corp Master – yes, I love that “master” bit – but a big portion of our time at home centers around gardening and learning to cook with the produce we grow. There are several gardens around the property where we grow greens, squash, beans, tomatoes, root vegetables, okra, berries, and herbs. Most community days we spend part of the time in the gardens learning about organic methods of pest and weed control, soil building, and the proper way to raise seedlings and harvest. We’re constantly adding to our compost pile, and one of our most successful community day projects used that and the skills we’ve learned to build our own garden.
We built our own rich soil in just an hour using only compost and mulches freely available around SMC, plus a little hay from a local farmer. It’s a technique called lasagna gardening, and it can be adapted to almost any setting, rural or urban, with rich or poor soil. Since the frost was not far off, we planted kale, spinach, and beets in late September, and are already beginning to harvest some of the greens. You can really feel the difference eating something that was just picked off the plant minutes before versus trucked for days across country. It just has so much more nutrition and energy in it. Sometimes we get more produce than we can eat in a short time from our gardens, so Heather has taught us how to can and pickle vegetables, and another fun community day project centered around fermentation so it’s all come together really well. We even got to meet Sandor Katz, the famous fermentation revivalist!
With just a few square feet of good soil and some staples from the local co-op, we’ve managed to feed 3-5 people this fall, and expand our cooking repertoires a lot! The garden doesn’t even take that much time to maintain. If you don’t have the space, time, or other limiting factors keep you out of the garden, it’s amazing what you can get for barter from your local farmer, or through gleaning. We will never need to buy butternut squash or bok choy again!
Some of the interns here have been working closely with local schools and Dig In!, a local food access nonprofit, which you will hear more about in later posts, so stay tuned! [...]
Read more...

August 17, 2016DATES: Positions run from Sept 24 2016-November 18 2016.
NOW HIRING food access and conservation members for our 2016 Residential Leadership Crew!! Calling young adults between ages 18-26, who want an opportunity to live communally on our awesome homestead near Asheville NC, complete food access and conservation projects both in our local community and on public lands, and learn about sustainable agriculture.
Members will complete an AmeriCorps term of service working on food access projects and trail maintenance/restoration throughout the Southeast. Following a brief orientation, members will be working at SMC headquarters and with local community partners on projects supporting local gardens and food access in under-served communities. Members will also prepare educational programming relating to these topics for public presentations.
Subsequently, members will complete 4 weeks of habitat restoration and trail management projects in Chattahoochee Bend State Park in Georgia, working and camping for up to 8 days at a time. Projects may include habitat restoration, trail maintenance, and/or trail construction. Members will receive additional trainings pertaining specifically to these projects. Between project “hitches,” the crew will return to SMC base where they will continue to receive room and board during off days.
While living at SMC headquarters in Western NC, members will also have opportunities throughout the season to learn about permaculture, engage in trainings and projects with local farms and organizations, and experience community living on a growing homestead. Members will engage in a weekly “community day” on site, which may consist of community meetings, chores, onsite agriculture projects, field trips, and additional trainings.
During some projects, the crew may camp for up to 8 days at a time. SMC provides tents and other group camping gear.
COMPENSATION AND BENEFITS:
$90/week living stipend + full room and board for the duration of the program.
Trainings and orientation with SMC and project partners (trainings may include: conservation work skills and tool use, construction and green design, gardening, permaculture and sustainable agriculture, food preservation, leave no trace camping, leadership, community building, teamwork, etc.)
Experience living and working in a vibrant residential community.
AmeriCorps educational scholarship upon completion of the program.
Plenty of opportunities to explore the beautiful southeast!
DESIRED SKILLS AND INTERESTS:.
Ability to hike for long distances carrying backpacks, tools, and equipment, completing repetitive motions, lifting heavy objects, and using machinery.
Ability to live and work in a physically demanding, possibly remote environment for an uninterrupted period of up to eight days.
Ability to work effectively as a member of a team despite potentially stressful and difficult conditions.
Experience and/or strong interest in conservation and invasive species management, and a desire to learn related skills.
Experience and/or strong interest in sustainable agriculture, gardening, and low impact living.
Experience and/or strong interest in leave no trace camping and back-country living.
Desire to live and work in a close knit residential community.
Willingness and ability to complete all aspects of the program. Members must commit to participating in all crew/team activities.
Apply now to join our 2016 residential leadership corps!
TO APPLY: Please send cover letter, resume, and three references to Heather Buckner at Hebuckner@gmail.com. Use subject line “SMC food access.” Members offered positions will be asked to fill out an additional application form.
You can also complete an online application at http://www.thesca.org/serve/position/smoky-mountain-corps-food-access-member/po-00703442
Applications will be accepted until August 31 or positions have been filled. [...]
Read more...

June 27, 2016DATES: Positions run from August 5 2016-November 23 2016.
NOW HIRING members for our 2016 Residential Leadership Crew!! Calling young adults between ages 18-25, who want an opportunity to live communally on our awesome homestead near Asheville NC, complete conservation and habitat restoration projects on public lands, and learn about sustainable agriculture.
Members will complete an AmeriCorps term of service working on invasive species management, trail maintenance, and other conservation projects throughout the Southeast. Following a brief orientation, members will be working with SMC partners to complete native plant management projects on sites near Asheville NC. Additionally, the crew will travel to Georgia to complete trail maintenance and habitat restoration projects in Chattahoochee Bend State Park.
While living at SMC headquarters in Western NC, members will also have opportunities throughout the season to learn about permaculture, engage in trainings and projects with local farms and organizations, and experience community living on a growing homestead. Members will engage in a weekly “community day” on site, which may consist of community meetings, chores, onsite agriculture projects, field trips, and additional trainings.
During some projects, the crew may camp for up to 8 days at a time. SMC provides tents and other group camping gear.
COMPENSATION AND BENEFITS:
$90/week living stipend + full room and board for the duration of the program.
Trainings and orientation with SMC and project partners (trainings may include: conservation work skills and tool use, construction and green design, gardening, permaculture and sustainable agriculture, food preservation, leave no trace camping, leadership, community building, teamwork, etc.)
Experience living and working in a vibrant residential community.
AmeriCorps educational scholarship upon completion of the program.
Plenty of opportunities to explore the beautiful southeast!
DESIRED SKILLS AND INTERESTS:.
Ability to hike for long distances carrying backpacks, tools, and equipment, completing repetitive motions, lifting heavy objects, and using machinery.
Ability to live and work in a physically demanding, possibly remote environment for an uninterrupted period of up to eight days.
Ability to work effectively as a member of a team despite potentially stressful and difficult conditions.
Experience and/or strong interest in conservation and invasive species management, and a desire to learn related skills.
Experience and/or strong interest in sustainable agriculture, gardening, and low impact living.
Experience and/or strong interest in leave no trace camping and back-country living.
Desire to live and work in a close knit residential community.
Willingness and ability to complete all aspects of the program. Members must commit to participating in all crew/team activities.
Environmental science, biology, botany, resources management, or similar degree preferred but not required.
Apply now to join our 2016 residential leadership corps!
TO APPLY: Please send cover letter, resume, and three references to Heather Buckner at Hebuckner@gmail.com
Applications will be accepted until July 15.
Applicants may also be asked to complete an additional online application which can be found at http://thesca.org/serve/position/smoky-mountain-corps/po-00699166. Use code PO-00699166 when requested.
For questions or to request more information please contact Heather Buckner: Hebuckner@gmail.com [...]
Read more...

June 24, 2016After a bustling summer and action packed fall here at Smoky Mountain Corps (the last of our 2015 corps members left us in November), it has been all peace and quiet here for the last several months. But the calm won’t last much longer…it is time to amp up preparations for our 2016 season!
SMC had an amazing first season in 2015. During 2015, we successfully launched our Residential Leadership Corps program which brought together a diverse group of young adults to receive hands on leadership training in conservation, sustainable agriculture, and community development while completing 14 weeks of service to the Southeast region. SMC Native Plants Interns spent their days working at Mountain True to manage invasive species on lands with federally protected rare and endangered plants. Additionally, SMC hosted a Summer Associate VISTA member who coordinated a public Community Garden Festival in Knoxville, TN and organized projects and trainings for the SMC Residential Leadership Corps.
The crew was able to work in some incredible places completing a myriad of meaningful service projects; trail work the Great Smoky Mountains National Park, bald management and habitat restoration in Pisgah National Forest, and the Community Garden Festival at the Center for Urban Agriculture in Knoxville.
In 2015, SMC members performed 10,133 hours of service, improving over 22 miles of trail and managing over 30 acres for habitat improvement. Members removed 27.5 acres of invasive species, cleared and planted 3000+ sq feet of gardens and assisted local community farms in projects for 100 hours. At the Community Garden Festival at the Center for Urban Agriculture, Members led 8 free public workshops and activities for over 120 people. In addition to all this service, SMC members received 20+ trainings in everything from trail construction, leadership development, and wilderness medicine to gardening, food preservation, and taking care of chickens.
Please see our annual report for a full overview of the 2015 season.
Indeed, it was a busy year. And now it is time to start all over again! We are extremely excited to announce that this year, SMC will be working under fiscal sponsorship of the Student Conservation Association, the organization that gave us our introduction to the conservation world, to run our second season of corps programming. As members ourselves of SCA’s esteemed New Hampshire Corps program way back in 2011, we began dreaming of one day building our own program down here in the beautiful Southeast. Now, with the support and guidance from SCA, Smoky Mountain Corps will have the opportunity to continue providing meaningful opportunities for young adults in the Southeast.
Please stay tuned for more updates and hiring announcements coming shortly!
Please consider making a donation Smoky Mountain Corps. 100% of contributions will be used to support and grow programs.
[...]
Read more...

August 14, 2015Gratitude: A List
By: Maddie Privott
We have been at this trail workin’ and community livin’ for nearly 3 months. Although we still have hard work ahead of us, the end is coming into view and I find myself having frequent moments of gratitude that have given me pause. In an effort to give others a glimpse into this experience and to articulate gratitude for our time here together, I want to list some of what I know I will miss as I recall my summer as an SMC crewmember. What words I find will undoubtedly be incomplete, but here are a few of the bits and the pieces:
Having a place at the table. Since leaving home for college time spent sharing a meal at a communal table has become a rarity. On hitch, “the table” might mean the crew perched on logs encircling a fire, or huddled beneath our kitchen tarp to escape the rain. Whether on hitch, or at the homestead, there is a warmth and magic to enjoying a meal with others whom you are in community with.
Eating our labors. If I let myself go, this whole list could center around the food we eat. I will simply say, vegetables taste better when they’re fresh from the garden.
Every meal ever prepared by the hands of Heather and/or Molly. Okay, okay I’m done.
Community meetings. They provide a space for direct communication, debriefing, thought provoking discussion, silly games, learning, and excessive coffee consumption.
Onsite projects. These have ranged from “Pickle It! 2015”, to constructing a cob oven, to planting veggies, and inoculating mushrooms. There have been myriad opportunities to learn skills and collaborate on projects.
The peculiar conversations we have on hitch. After you’ve been outside for days with a group of folks with little for entertainment but the company of one another, you may find that the conversation topics begin to depart from the norm. You reach down deep into the recesses of your mind and find the weird stuff. Hitch is a unique context in which to get to know someone. It accelerates the process of reciprocity and openness.
Remembering how to laugh like a little kid. See #1, #6, and #10.
The mountains and woods. I would be remiss not to mention how special it is to go to sleep to an insect choir singing to the constant exhale of a river, and then to wake up and go outside and simultaneously go to work.
The SMC team. Becki, Eliza, Heather, Jon, Michael, Molly, Natalie, Sean, Tuck, and Vincent are people I am thankful to have spent this summer living among. The work we do requires a good measure of grit, and jumping into a residential program with strangers requires a good measure of flexibility and graciousness. Each of these folks have demonstrated all three, and much more.
The whole crew singing/yelling Annie’s “Tomorrow” in unison the final night on hitch. This ritual started on the first hitch and has continued throughout the summer. In my opinion, we would all be capable of playing ourselves in a production chronicling the SMC pilot program. But I digress.
-Maddie [...]
Read more...

August 9, 2015SMC goes to Whippoorwill Earth Skills Festival
By: Michael Mason
This past month, Smoky Mountain Center visited the fourth annual Whippoorwill earth skills Festival in Berea, Kentucky. This served as a great opportunity for us to learn many new skills as well as to gain insight on how we may want to lead our own own workshops, which we are currently preparing for a public gardening festival at the end of the summer.
The festival offered over 75 workshops this year covering a variety of topics, and we could choose to attend whatever we were most interested in learning. To name a few there was meditation, hugelkultur gardening, worm composting, leatherwork, and a few field trips to local farms.
Leatherworking workshop where you could learn to make your own moccasins or a handbag.
Camping area where SMC members and staff stayed during the festival
We also volunteered in the kitchen during the event helping with food prep, serving, and dishes.
During this festival we learned many knew skills and brushed up on some others. We also left with a much better idea in mind for how to lead our own workshops in our *Community Garden Festival taking place at the end of August!
-Michael
*Smoky Mountain Center’s Community Garden Festival takes place in Knoxville, Tennessee at the Center for Urban Agriculture on Saturday, August 29th from 12-4pm. This event offers FREE workshops presented by the Smoky Mountain Center of North Carolina including: Composting with Worms, Appalachian Seasonal Cooking, DIY Solar Oven for Kids, and Scraps to Gardens – Upcycling. Participate in a juicy watermelon eating contest to get a chance to win a $25 gift certificate to the Three Rivers Market Co-op! Enjoy food, music, kids crafts, take a tour of the beautiful gardens, and meet some of your local non-profits in the Knoxville area. This family friendly event will include various hands-on activities for children and adults of all ages. We cannot wait to see you at the Center for Urban Agriculture on August 29th! [...]
Read more...

July 27, 2015Smoky Mountain Center is hiring Individual Placement Interns for placements starting August 10th!
Position Description: Smoky Mountain Center’s Native Plants Interns work with MountainTrue, a non-profit that performs non-native invasive plant control on public lands and protected conservation easements where rare plant and animal species occur. With training and supervision from MountainTrue, the Native Plants Intern will help control and eliminate non-native invasive plants from up to four different wetland bog sites that have been protected due to federal and state listed species occurring within them. Invasives currently threaten these rare species and this work will restore these natural ecosystems. The intern will be treating up to 24 different non-native invasive plant species through manual, mechanical, and chemical control methods. Intern will work 4 ten hour days in the field each week and may be camping during projects.
Program dates: August 10, 2015-October 31, 2015
Location: Project sites in Western North Carolina, based out of Asheville, North Carolina
Living Allowance: $225 weekly living stipend. Possible option to camp at Smoky Mountain Center headquarters in Burnsville, NC during off days and take advantage of activities happening on site.
AmeriCorps Award: Eligible for an AmeriCorps education award upon successful completion of the program.
Age:18+
See the full position description for more information and to apply
Please contact: Heather@conservationlegacy.org for more info
[...]
Read more...

July 6, 2015SMC JamBerry
By: Becki Linhart
July is just around the corner, and we have already completed two 8-day hitches in the Pisgah National Forest. We have accomplished a lot during those days working on trails and maintaining mountain balds. As a group, we have learned a lot of new skills and knowledge.
However, the great thing about this residential program is that there is a lot more to it than just the work we do during those hitches. I am amazed that I am able to learn just as much on my days off at the site than I do at work. Our place here in Burnsville is a living situation that is very different than what a lot of us are used to. During the past several weeks at the Smoky Mountain Center, the seven of us corps members have been making ourselves at home at the facility and are constantly learning what it means to live in a sustainably and healthy way, and as a member of a community.
During our five days off, when we aren’t swimming in the pond, practicing our ukulele skills, or exploring the local area, we participate in projects for the facility. In community meetings, which take place the day after we come back from each hitch, we all discuss these projects that we wish to complete as a group during these off days. A lot of these things that we have discussed, such as rainwater catchment systems and canning, are great things for us all to learn so that we can apply them to our futures as conservation leaders and role models in our everyday lives or careers. Other things, like painting the Bird’s Nest (our name for the girl’s cabin due to the avian visitors that it often gets) and the outhouse, are projects that just allow us to contribute to making the homestead a better and friendlier place.
This past break, we teamed up to make some homemade jam that we then canned for later use. This made for a a fun Sunday afternoon in which we spread out around the property to gather as many blackberries, raspberries, and mulberries as possible. In just a short period of time, we were able to get a total of 18 cups of berries. We then proceeded to add the sugar and cook up the berry mixture, and then canned our end result. Of course, we put aside some for us to enjoy right away with some toast. Not only was this a fun day spent with good people and plenty of jam puns, but I learned a few valuable things and was excited to make something delicious from the food that is available here on the property.
Our future projects include pickling, foraging, fixing up our solar dehydrator, among many others. I am excited for all that lies ahead this summer and to learn as much as I can through these projects as well as from the others in the community who all have a special set of knowledge and skills to share with the rest of us.
-Becki [...]
Read more...

July 1, 2015Forming
By: Natalie Woodcock
As my old Volvo chugs it’s way up the steep, windy road of US-226, I begin to think back to my first year of college and the flurry of uncertainties that accompanied the transition. After acquiring the most expensive piece of paper of my life, I made the decision to join the pilot crew of the Smoky Mountain Center and experience these uncertainties all over again. I had learned all about conservation corps through my Outdoor Recreation degree at Indiana University (the CCC was likely mentioned at least once a week), but I could never realistically imagine what the experience of being a corps member would bring. I had built a vibrant, friendly, inspiring community at IU, and I was leaving it all to start from scratch in Western North Carolina.
A month after making it up the windy roads and settling into my small cabin at the Smoky Mountain Center, it has already become clear to me the ways in which people can constantly surprise you. Because the Smoky Mountain Center is a residential program, relationships seem to form ten times faster than normal. Living and working in the backcountry for 8 days at a time and then returning to the homestead to continue to share the realities of living together uncovers many joys as well as challenges. An extra dose of communication and openness is required in community living. I have learned that issues that go unaddressed will not simply “blow over”…you may be able to avoid confrontation for a small period of time, but conflict will inevitably arise.
Nonetheless, there is something rich and satisfying about working alongside the people you live with. Sharing experiences of struggle, exhaustion, success, and accomplishment peels back the layers of a person’s personality that too often remains closed. During my time studying Recreation, the psychology of group dynamics was often a topic of discussion. The phrase from Bruce Tuckman’s stages of group development, “Forming, Storming, Norming, and Performing”, was another common discussion topic within my field along with the CCC. The catchy rhyme rings in my head whenever I encounter a group experience. Storming is often the most sensational and overly discussed phase within group development, however Forming is often overlooked. The phenomena of strangers meeting and developing relationships is too often lost amidst the chaos of beginnings. These moments however, are when humans have the opportunity to exhibit a quality lacking in our culture: vulnerability.
In a society obsessed with being in control, the ability to be vulnerable has become a lost art. We all want to appear to have our lives figured out when the reality is (excuse the cliche) life is unpredictable. Living with complete strangers has the potential to be one of the most unpredictable experiences out there, but add on living with strangers in the woods and you’ve just conjured up a control freak’s worst nightmare. The illusion of control is removed by both literal and figurative forces of nature. You are forced to be vulnerable. Really amazing things can happen during the Forming stage of group development if people are open to vulnerability. Although it can be terrifying, vulnerability is the lens into who we are as a human being. It allows us to experience defeat, loss, hurt, and grief and discover that it is possible to overcome these feelings.
My first month with the Smoky Mountain Center has presented me with a plethora of opportunities to be vulnerable. I feel lucky to be surrounded by people willing to be open and risk being vulnerable to form relationships. I’m looking forward to what the rest of my time with a conservation corps will bring.
-Natalie
[...]
Read more...
You must be logged in to post a comment.